Data has been entered into our GPS system for an onboardee. Since the mission doesn't yet have all the onboardee's data, the onboardee is asked to complete this information before starting work. This manual describes how to do this.
Wherever “he” is written, can be read as “he/she/it”.
Names in this manual are those of fictitious people.
Activate account
You will receive two emails from GPS:
- An email indicating what is expected of you:
- activating the account
- logging in to the onboarding portal
- completing the personal data. - An email to activate the Succesfactors account.
This document describes the steps you need to take and provides an explanation of each step.
Install Authenticator app
GPS works with a two factor authentication.
This can be done in two ways, you can indicate that you want to receive an email with a time-based one time passcode.
Or you generate the code with a time-base application app on the smartphone. You can download this from the app store of the smartphone. For example, you can use Google Authenticator or Microsoft Authenticator.
Activate SuccessFactors account
1. Open the mail with the title Activate Your SAP SuccessFactors Account
2. Click on the link Click here to Activate your account (1)
3. Select TOTP Two-Factor Authentication (1)
4. Open the Authenticator-app on your phone and scan the QR-code (1). A new account has been created in the Authenticator.
5. Open the account and copy the passcode. Fill in the passcode in the field Passcode (2) and click on Continue (3)
6. Check your first name and last name (1). When incorrect, change it.
7. Create your own password (2). You password must be between 8 and 255 characters long and include 3 of the following:
- a. Upercase letters
- b. Lowercase letters
- c. Numbers
- d. Symbols
8. Click on Save (3). Your account has been created.
9. Click in the next screen on Continue. Now you enter GPS.
Provide Personal Details
After you have created the account, you will enter GPS. We request you to fill in your personal details.

Fields with a red asterisk are mandatory fields. Don't forget to save your changes in between.
You can do this by scrolling down and clicking Save Draft.
Actions
1. Click on Provide Personal Details (1)
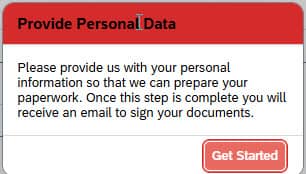
2. Click on Get Started (1).
3. Select the Salutation (1). If applicable select the Suffix (2). And fill in your Birth Name (3) (The last name you were given at birth) without any prefix.
4. Scroll down to Personal information.
5. Fill in the fields First Names (1), Initials (2) without dots, Prefix (3) (of birthname if applicable), Gender (4), Marital Status (5), Last Name as in passport (6), Nationality (7), Name Format (8) and if applicable also the other fields in this screen
6. Scroll down to Biographical information
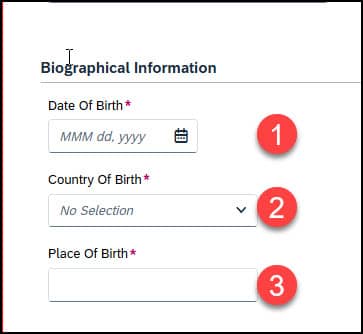
7. Fill in your Date of Birth (1), Country of birth (2) and Place of Birth (4).
8. Scroll down to National ID / Tax number (BSN).
9. Click Add (1) to add a record.
10. Select Country/region (2) from the list, by typing the first letters of the country/region.
11. Select the National Id Card Type (3) from the picklist.
12. Fill in the number of National ID (4) and select Yes of No in the field Is Primary (5).
13. Upload a copy of the National Card ID by clicking on the paperclip (6).
14. Fill in the Issue Date (7) of the National ID Card.
15. Click Add (1) to create a new record if you have another National ID / Tax number (BSN)
16. Click Continue (8) when all the mandatory fields has been filled in. A new screen with Personal information appears
17. Click on Add Personal Documents (passport, ID, Workpermit) to upload a copy of one of these documents.
18. Select the Document type (1) from the picklist, fill in the Document number (2)
19. Select the Issue Date (3) and Expiration Date (4) from the calendar
20. Click on Upload (5) to attach a copy of the document.
21. To add another document, click on Add Personel Documents (passport, ID, Workpermit) (6)
22. Scroll down to Email information
23. Check your Personal Email address (1).
24. Click below Phone Information on Add (2).
25. Fill in your personal phone number.
26. Scroll down to Adresses
27. Select in Address type (1) home address and, fill in your address
28. Click on Show 6 more fields to show more address fields
29. Click on Add Addresses (2) to add another address, for example for your mailings
30. Scroll down to Emergency contact
31. Enter the details of the person we can be contacted in the event of an emergency in Primary Emergency Contact. To create a (new) record, click on Add Primary Emergency Contact (1). By clicking on Edit Details you can enter more information about your emergency contact.
32. Under Family members you can enter your family members. Under family members we mean children, spouse, partner registered, partner non-registered, Supplementation: deceased partner, Supplementation: deceased spouse. If you need a (new) record, click Add Family members (2). By clicking on Edit Details you can enter more information about your family members
33. Click Continue (3).
34. Fill in the Payment information.
35. Select Payment method (1), Bank Country/Region (2) and Bank (3) from the picklist.
36. Fill in your IBAN-number (4) and Account Owner (5). If you don’t have an IBAN-number, fill in the Account Number (4) and Account Owner (5).
37. Fill in the fields specially for your country. In this example are this the fields Account Type (South Africa) (6) and Account Holder Relationship (South Africa) (7)[/b
38. Select the Currency (8) of the bankaccount.
39. Scroll down and add an [b]attachment (9). This is a copy where the bank, account number and account holder are clearly legible. This can be a copy of a bank statement, where the balances have been made illegible
40. Click on Submit (10) in the right corner to save the information.
41. In the pop-up select Confirm to submit your data.
42. Click OK after the submit has been finished.
Completing your Profile
- Select Start Completing Your Profile.
- On the next screen you can upload a profile photo.
- Click on Save.
You have completed the Personal Data and the operational manager from the mission where you start working will continue with the registration. You will soon also receive an employment contract and/or other documents you need to sign.
In case the documents will be signed digitally, you will be informed in your personal email, so check your mail frequently. In case you will sign the employment contract on paper, you will receive information about an appointment to go to the mission.
FAQ
My session has expired, how can I log in again?
You have received two emails. An email to activate your account and an email with a link that you can use to log in once the account has been activated. Click on this link and log in with the user account and password that you created in Chapter 2.2.
Then choose TOTP Two-Factor Authentication.
Then generate a passcode in the authenticator app on the smartphone
I don’t have a smartphone. How could I create a passcode?
Contact the mission you are going to work for. They can arrange for you to receive a passcode via another method. This can take a few days to arrange.